Pop-up events let you run chair massage taster sessions, open days, or corporate wellness events with a public QR-code registration page and live queue management — all from your phone.
Creating an event
Go to Events in the dashboard nav and click New event. Fill in:
- Event name — shown on the public registration page (e.g. "Chair Massage Taster Session")
- Location — the venue name shown to clients
- Date, start and end time — the full event window
- Slot duration — how long each treatment takes. Anything from a 5-minute taster up to a full 60 or 90-minute treatment, so events work for retreats and wellness days, not just quick chair massage
- Breaks — optional; block off time when you can't take bookings, like a lunch break or a group session (see below)
- Clients pay to book — optional; tick this to take a card at the time of booking (see below)
- Description — optional, shown at the top of the registration page
MassageHub automatically generates a URL slug (e.g. nuffield-taster-31mar) from the event name and date. You can edit it before saving.
Creating an event also automatically blocks your normal booking calendar for that window, so regular appointment slots are hidden during the event.
Paid events — take a card at booking
If you want attendees to pay upfront (for example paid slots at a retreat or wellness day), tick Clients pay to book when you create or edit the event and set a price per slot. Free events stay exactly as they are — this only changes things when the toggle is on.
On a paid event, a client picks a time slot, enters their card and pays there and then, and is booked in. Their chosen slot is held while they pay, so two people can't pay for the same one — if a hold is abandoned it frees up automatically after about 20 minutes. The money goes straight to your connected Stripe account, the same as every other payment on MassageHub, so you'll need Stripe set up under Settings → Payments first.
You can change the price later from the event's Edit screen. Price changes only affect new bookings — anyone already booked keeps the price they paid.
If you cancel a paid event, everyone who paid is refunded automatically. You don't need to refund anyone by hand.
Blocking off time within an event (breaks)
If part of your event day isn't available for bookings — a lunch break, or a group session where everyone's occupied — add a break instead of splitting the day into two separate events. Under Breaks (optional) when you create or edit an event, pick a start and end time, and add as many breaks as you need.
Any slot that falls in a break disappears from your public booking page, so clients can't book it. On your own Schedule tab the break shows as a greyed Break band, so the gap is clear at a glance. Like the date and time, breaks lock once someone has pre-booked a slot.
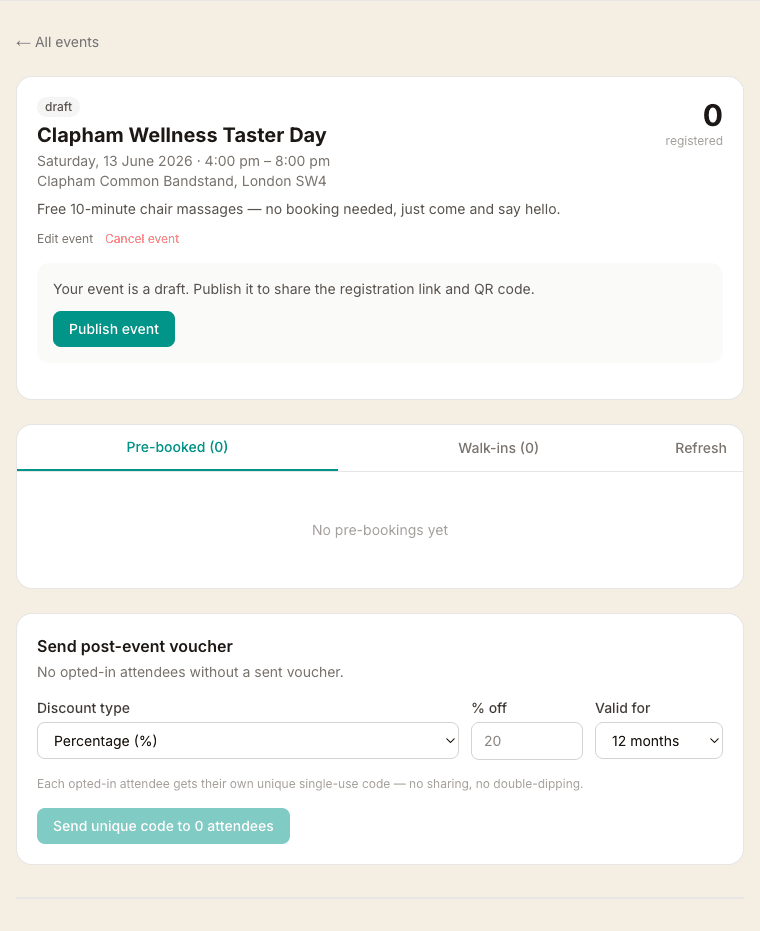
Publishing and sharing
New events start as Draft. When you're ready, click Publish event — the registration page goes live immediately.
From the event detail page you can:
- Copy the registration link to share on social media or via text
- Download a QR code image to print on posters, display on a venue screen, or show on your phone
The public URL looks like: massagehub.app/your-name/event/event-slug
How clients register
The registration form captures:
- Name, email, and phone number
- A medical screening question (do you have any conditions I should know about? — with a detail field if yes)
- A GDPR opt-in checkbox: "I'd like to receive a post-event discount voucher by email" (unchecked by default)
Before the event starts, clients can also choose a specific time slot. After the event starts, the slot picker is hidden and everyone joins the walk-in queue.
After registering, clients receive a confirmation email with their slot time or queue position number.
Managing the event on the day
Open the event in your dashboard and switch to the Schedule tab. You'll see:
- Schedule — all time slots, showing who is booked into each one and their current status
- Walk-in queue — everyone without a pre-booked slot, in order of arrival
For each person, you have three action buttons:
- Start — marks them as in progress and, for walk-ins, automatically assigns them the next available future slot
- Done ✓ — marks the treatment as complete
- No show — marks them as a no-show; tap Returned if they come back to put them back in the queue
Tap Refresh at any time to pull in new registrations without reloading the page.
You can also manually assign a walk-in to a specific slot using the Assign slot button — past slots are greyed out.
Editing an event
Click the Edit button on the event page to update the name or description at any time.
The location, date, time, and breaks can only be changed before anyone has pre-booked a slot. Once a pre-booking exists, those fields are locked to protect attendees who have confirmed a specific time.
Cancelling or rescheduling
Click Cancel event to cancel. You have two options:
- Cancel — sends a cancellation email to all registered attendees
- Cancel & reschedule — sends a notification with a link to a new event (create the new event first, then paste its URL here)
Cancelling also removes the calendar block, so your normal appointment slots open back up for that window.
Sending post-event discount vouchers
After the event, scroll to the Send post-event voucher panel on the event page.
- Choose a discount type (percentage or fixed amount) and value
- Set how many months the voucher is valid for
- Click Send unique code to X attendees
Each opted-in attendee receives their own unique single-use discount code by email. Codes are automatically created in your Discount Codes list and can be redeemed at checkout on your booking page — they cannot be shared or used more than once.
You can only send vouchers once per event. The panel shows who opted in and a confirmation message once sent.