When you join MassageHub, a short guided setup walks you through everything in one go. By the end you'll have a complete, bookable profile and a link you can start sharing with clients — usually in well under five minutes.
The guided setup
The first time you sign in, MassageHub takes you straight into a step-by-step setup — no hunting through menus. Each step appears in order, and your progress is saved as you go, so you can stop and pick up exactly where you left off.
It walks you through:
- A few quick questions — where you treat clients (a clinic, mobile visits, or both), how you like to take payment, and your booking link. Your answers tailor the rest of the setup.
- Your location — your clinic address, or the area you travel from for mobile visits (or both). This ties your services and availability together.
- What you offer — pick from the treatments most therapists offer (deep tissue, relaxing, sports, pregnancy), each with a suggested price you can change, or add your own with any length. Pick as many as you like; just one makes you bookable, and you can add more anytime.
- Your hours — your usual weekly availability, pre-filled with a sensible Monday–Friday pattern you can adjust.
- Your bio — we draft a warm, professional bio from the details you've entered. Tweak it however you like, or ask for a fresh draft.
That's it — you finish on a page with your booking link ready to copy and share. New profiles go through a quick automatic safety review (usually just a few minutes) before they appear publicly; we'll email you the moment yours is live. The review starts once your location, at least one service and your hours are in place — the Required to go live steps on Getting Started — so if you skip one, your dashboard shows what's left and your profile goes live automatically when it's done.
Not ready to go live yet?
If you'd rather finish your profile in your own time, you don't have to let it publish itself. Go to Settings, then Profile, and tick Keep my profile private until I'm ready at the top of the page. Nothing goes live until you say so.
While it's on, anyone who opens your link sees a short note saying you're still setting up, rather than your page. You won't appear in search results or in Trusted Therapists, and no booking can be made. You can keep editing everything as normal, as often as you like.
When you're ready, untick it. Your profile goes through the same quick automatic check as everyone else's and, all being well, is live within seconds. We'll email you to confirm. If a Required to go live step is still missing, we'll point you to what's left on Getting Started, and your profile goes live automatically as soon as it's done. If anything needs a closer look first, we'll tell you on the spot and come back to you.
Already live and want to step back? Ticking the box takes your page off the public site straight away. Untick it whenever you want to return.
Prefer to finish later?
Every setup step has an “I'll finish this later” link. If you skip ahead, the Get started page keeps track of what's left so you can come back anytime.
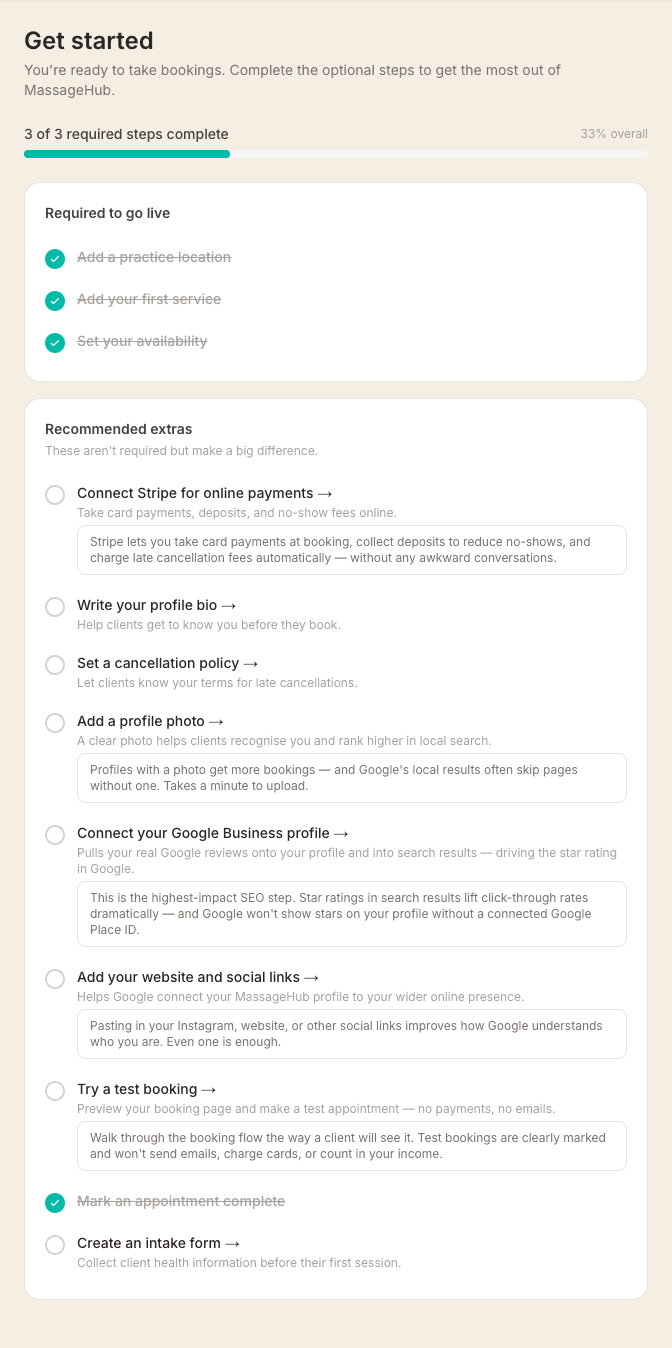
Recommended extras
Once you're bookable, the Get started checklist suggests a few high-impact additions. None are required to take bookings, but each helps you get found and look the part:
- Connect Stripe for online card payments, deposits, and automatic no-show fees.
- Add a profile photo — profiles with a photo get more bookings and rank better in local search.
- Connect your Google Business profile to pull your real Google reviews onto your page.
- Create an intake form — a health questionnaire that's sent automatically with booking confirmations so clients complete it before their first session.
Not every extra applies to everyone. If one isn't relevant — say you're starting fresh and have no existing clients to import — tap Not needed beside it to hide it, and it no longer counts against your progress. Changed your mind? A Show hidden steps link at the bottom of the list brings any of them back. Your required go-live steps stay put and can't be hidden.
Adding more, and fine-tuning later
Everything the guided setup created can be edited anytime. Clicking Settings in the top bar opens a tile grid of every area you can configure — Locations, Services, Availability, Payments, and so on. Tiles you've already set up show a soft green pill (e.g. “2 active”), so it's easy to see where you are. Add more services, extra locations, or adjust your hours per location whenever you like.
Try a test booking
Before you share your link widely, make a test booking yourself. From the dashboard or the Get started page click Preview booking page. Any booking made while you're logged in as the therapist is flagged as a test — no card charges, no emails to real clients, and it won't count in your income.
Test bookings show a purple TEST badge when you open them. When you're done, use Clear test bookings on the Get started page to wipe them in one click. See Test your booking flow for details.